
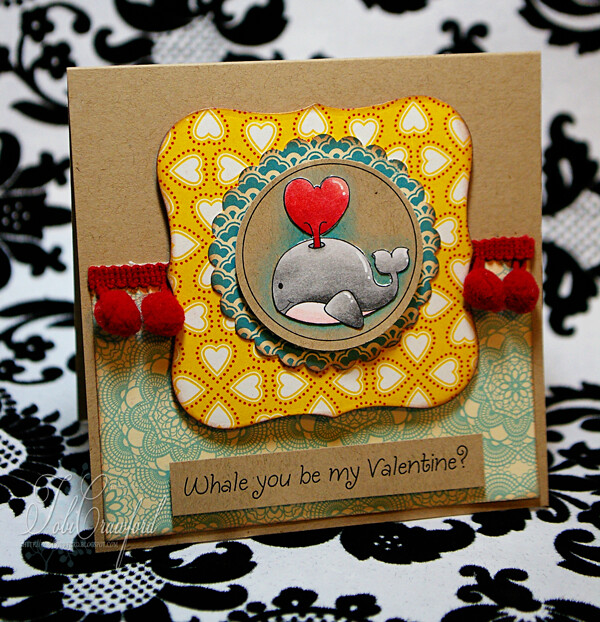
Whale you?

This image is from Whimsie Doodle. I have loved their cute designs for a long time and just bought one of the new releases called Valen-tinies! I printed a bunch of the designs out on kraft cardstock and used coloured pencils with Gamsol. If you don't know what Gamsol does, it's paint thinner that breaks down/smooths out your pencil colouring and blends the colours together for a wonderful result!
A lot of die cuts and layers make this card pretty heavy and THICK, but I love it... It's going to have to go in a really big envelope, that's all!! lol.. The papers are October Afternoon, and I used Nestabilites to cut the loopy frame, and Marvy circle punches to cut out the whale and mat.
Thanx for stopping by!
My favorite medium to colour with is Copic markers, but a close second is coloring with pencil crayons and odorless mineral spirits, or "gamsol." The gamsol kind of melts the crayon and blends colors together while helping to soften lines left by the pencils. I get a lot of questions about pencils and gamsol because it's growing in popularity and it's also an inexpensive alternative to copics. I use Koh-I-Noor pencils ($25/set) and Derwent pencils ($1.50 each) so they are WAY cheaper than my $1000 collection of markers!
Here are the supplies I used:

Gamsol comes in a big bottle so I transfer it into a smaller
squeeze bottle for easier pouring. I use a tea-light holder as a vessel for the liquid.

Blending stumps are the tools for holding the gamsol and
blending the colors together. I used one tip for each color. The alternative
is to sand the tips down to clear the color away. This is quicker...

I color-match my pencils to the papers I will be using. Because I don't have
hundreds of colors, blending different shades together is often needed
so I like to try the colors out before I color the image.

I roughly color the image going over the entire area with
the lightest color, then add shading with darker colours on the edges.

Dip the stump into the gamsol and you will see it suck up the liquid.

Start by blending the darker colors and blend into the lighter colors.
You will have to re-dip the stump into the gamsol as the tip dries out.

This is the image after I blended the initial layer of greens..
I added more dark a couple times until I got the contrast I was happy with..


I colored the frog image twice and cut one out and
popped it on top of the other. (paper tole)
(The sentiment is from a St. Patricks Day set of stickers from SRM!)
I've been getting some happy mail recently and
haven't had a tonne of time to play. :(
It's spring break, though, and I've had a little time this weekend to put some projects
together, so here's a card:
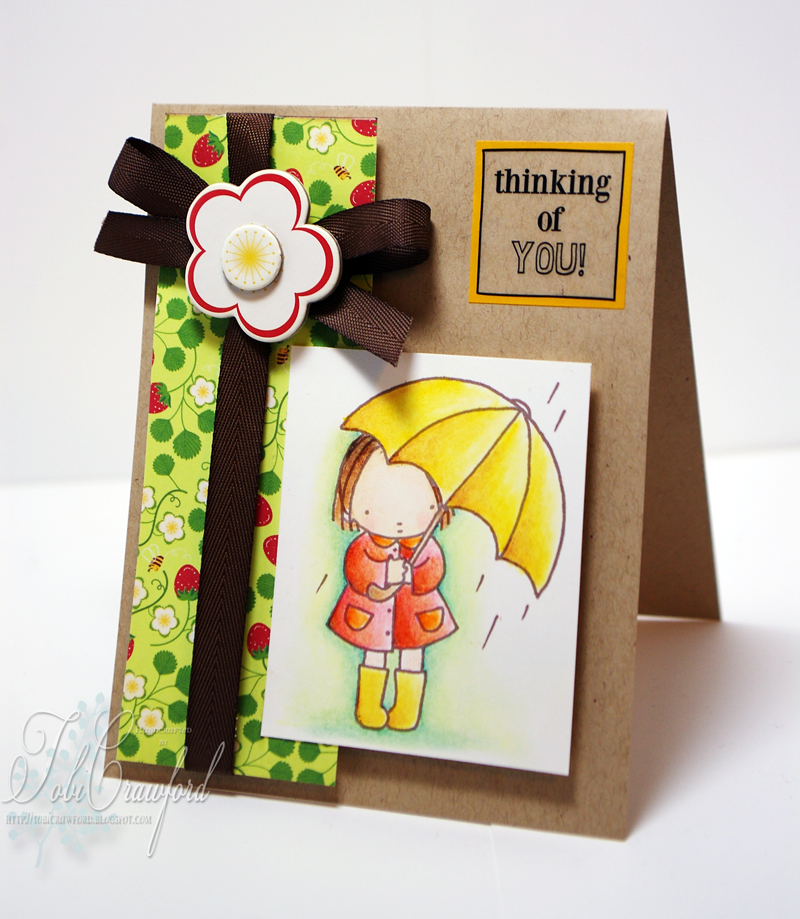
I coloured her with pencils and gamsol on SU! Whisper White paper.
The stamp is from My Favorite Things called "My Umbrella."
The paper is NEW Cosmo Cricket called "Garden Variety"
and the sticker sentiment is SRM called "Quick Cards - Hello."
Today I'm off to the Vancouver Aquarium with the fam'. It's beautiful weather so
it's looking like it will be a perfect day!
Welcome to another Jacksonbelle Tuesday challenge. Our challenge this week is a color challenge. Make a card or project using white, brown and blue. We’d love for you to play along. If you do be sure to leave us a link to your project in the comments section of this post or use keyword JBE095 when uploading to SCS or PCP.
Here's my card.. It's gotta be one of the simplest cards I've ever done..
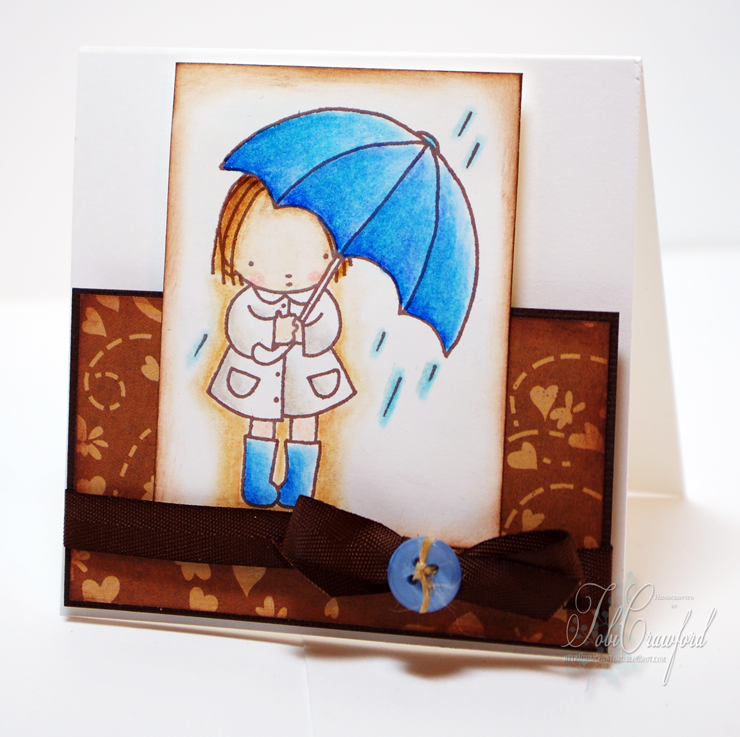
It's all about the image with this card! Don't you just love
her little face? I coloured this with my various coloured pencils and odourless mineral spirits.
I fooled my husband, he thought I did this with Copics so I must have done an "ok" colouring job!
See what else the 'belles did with Blue, Brown and White!
Amy Tsuruta Dawn Lusk Heather Lee-Reppen
Heather Pulvirenti Jill Dunn Julie Lacey Lynda Benden
Pam Varnell Shemaine Smith Stephanie Severin Windy Robinson
Heather Pulvirenti Jill Dunn Julie Lacey Lynda Benden
Pam Varnell Shemaine Smith Stephanie Severin Windy Robinson
Supplies: Stamps: "My Umbrella" by MFT; Basic Grey Patterned paper, Bazzill, Neenah; PTI Ribbon and bulk blue button.
 This is the first day of my last sneak peek with Elzybells. :( It's been a really fun year and I've learned so much from the other DT gals. 5 girls will be continuing their assignment, and I will be enjoying the Elzybells as a customer now! Elizabeth has been a great "boss" and I hope her company continues to flourish. (I'm especially hoping it will flourish in North America VERY soon, haha...)
Here's my first card:

He's really pasty-white, but I don't have a tan skin colour that isn't brown-looking. So white he is. It's his first day out boarding, ok?? I used Koh-I-Noor and Derwent pencils with Gamsol. Here's how I store the Gamsol for use with my crafting:

I found the container I bought the Gamsol in was very messy when I tried to pour it in my tea-light holder which I use as my "dish" so I found an extra M.A.C. (makeup) bottle hanging around and voila! They have a flip-top and small hole on the top so now I have no more messy, stinky spills. Most M.A.C. stores have the bottles shown and they're fairly inexpensive, but any travel-size bottle would do.
Check out the rest of the DT:


I hope you've enjoyed the sneak peeks I've shown you the last couple of days. The stamps are available now in the Elzybells shop!
Now I will show you the last card I made using "Pamper Yourself" and "Thank You For."
Pamper yourself is what Elizabeth calls a "Dinkie Set" that is unmounted rubber and comes with a variety of images and Thank You For is a clear set of images that have very unique and versatile sentiments.

I pulled out the ol' sewing machine for this card at the last minute. I was just about to glue everything together when it just looked a little basic. I said to myself "what would make this card go to the next level?" and my answer to myself (it was 12:30 am okay!!) was sewing!!!

Check out the rest of the dt design's and be sure to head over to the Elzybells store.

This next release has a bunch of "girly" stamps and I had a lot of fun colouring "Elzybell" again! Here's a look at a "multi" stamp that's being released:

It's stamped on kraft (obviously) and coloured in with Koh-I-Noor pencils. Here's the entire card with a new Elzy image:

I coloured her in with Copic markers. I actually did a version with Koh-I-noor pencils but didn't like it as much, so I went with my old faithful's.. Check out the other girls' work and I'll see you tomorrow with another peek!
and let me tell you, I'm exhausted. I've had a chance to sit down to make a couple of cards here and there, but I haven't had time to post them, so I'm playing catch-up today. Here's a card I make using this week's CPS sketch. I LOVE how this card turned out. The colours are just gorgeous.


This is how I did the main panel:
- cut out the main panel with nestabilities.
- stamped the main image(s) in versacolor ink then embossed with clear embossing powder.
- airbrushed the background with copic markers and airbrush system with two colors leaving the nestabilities die on the paper so it leaves the white border.
- coloured the "flames" with Koh-I-Noor pencils and gamsol

Cute sentiment eh?
Supplies:
- Paper: Bazzil, Papertrey Ink, Cosmo Cricket
- Ink: Momento (London Fog), Versacolor (charcoal)
- Stamps: Crafty Secrets
- Copic markers, embossing powder, Koh-I-Noor pencils, EK punches, AMuse ribbon, Nestabilities dies, Cuttlebug

That's right! The Elzybells shop is loaded with all of the new goodies, so hop on over and
take a look!
I also wanted to mention that for a couple of my sneak peek's I've been using Koh-I-Noor pencils that Elizabeth is now offering in her store, and so for today's final sneak peek I wanted to feature them.. I'm not as good as Paula is, but I'm really trying!!!

Elizabeth did a tutorial on her blog about how they work, and for the beginning pencil crayon-user it's a great resource. I just try to think of how I would use my copics, where I would add shading etc, and apply those skills to the pencils.. Here's a close-up of my work:

Ian said "that's a really simple card for you." And yes, it is, but I like no-layer cards sometimes!!!
So take care, look at everyone else's sneak peeks, and have fun shopping!

Another sneak peek of cuteness... I'm still in the middle of my love affair with my Silhouette, and really enjoying making shaped cards.. I'm not totally comfortable decorating them, I kind of have a block, but I think if I keep trying I'm apt to have some good ideas soon...

This one was really all about the image because the card base was really busy and bright, and didn't really need much else. I coloured the bears with Koh-I-Noor pencils and Gamsol with blending stumps. I am really trying to get better at colouring with this medium.

I added a thick piece of white on the inside to not only write on, but the patterned paper was a little flimsy, so it helped to add support.. I think this will make a really cute birthday card for someone!!
Check out the other Elzybelles sneak peeks too:
- Angel Rivera
- Charlene Austin
- Deborah Southard
- Frances Byrne
- Jeanne Streiff
- Kim Fee
- Maria Adams
- Michelle Short
- Paula Williamson
- Rachel Hope Baird
- Stephanie Mayne
Every few months at SCS there is what's called a "Virtual Stamp Night" where there are challenges posted hourly and prizes to be won. You have to make a card in 45 minutes or less, and I find it a great way to get a lot of cards done quickly. I don't always like the results, but some interesting ideas always come out of me anyway..
Here was a card I made that had to be inspired by food or drink.. I made this coffee cup card with my Silhouette using a cup die-cut and creating a mirror image to make it into a card base! I'm glad it worked, but I really don't like this card. Maybe it's the colours... but whatever.. I saved the card template and I will cut it out in a more neutral card base next time.


This next challenge was to use the "grid technique" which simply means you score a grid onto a piece of CS and use it as a layer.. I used my scor-pal to make the grid.


Elizabeth sent me a cool new tool: gold and silver Koh-I-Noor pencils! I love how even after you blend with gamsol the pencil still retains its shimmer.
 This challenge was to use the colours BLACK, WHITE, AND RED only. I use this colour combo often so it wasn't hard to put this card together in less than 10 minutes. This was the stamp set I used:


I used the stamps Ian and I used on our invitations and some pretty bright colours!!!
This final card is one of my favourites.. Ever... Everything just worked out so well on it.

This challenge was to use the spotlight technique. Here's how the image looked separated:

I used Making Memories tag maker to cut out the circle and make it into a tag. Everytime I do this technique I LOVE the result.. *Tobi... don't forget to do this again soon!*
Well I am clearly recovering well. I have had some sizable naps today, but I was still happy with what I accomplished! Take care!
Here was a card I made that had to be inspired by food or drink.. I made this coffee cup card with my Silhouette using a cup die-cut and creating a mirror image to make it into a card base! I'm glad it worked, but I really don't like this card. Maybe it's the colours... but whatever.. I saved the card template and I will cut it out in a more neutral card base next time.


This next challenge was to use the "grid technique" which simply means you score a grid onto a piece of CS and use it as a layer.. I used my scor-pal to make the grid.


Elizabeth sent me a cool new tool: gold and silver Koh-I-Noor pencils! I love how even after you blend with gamsol the pencil still retains its shimmer.


Here was an interesting challenge. Make a colourful wedding card! Most people associate weddings with soft pastels and such, but this is the kind of card I usually make for such happy occasions! The layout etc. isn't perfect, but again, I only had 45 minutes, so this is the final product:

I used the stamps Ian and I used on our invitations and some pretty bright colours!!!
This final card is one of my favourites.. Ever... Everything just worked out so well on it.

This challenge was to use the spotlight technique. Here's how the image looked separated:

I used Making Memories tag maker to cut out the circle and make it into a tag. Everytime I do this technique I LOVE the result.. *Tobi... don't forget to do this again soon!*
Well I am clearly recovering well. I have had some sizable naps today, but I was still happy with what I accomplished! Take care!


And here's my card:

 I used my Koh-I-Noor pencils and gamsol on this little guy in pretty unique colours, but I love how he turned out! All of the papers and the butterfly are Making Memories. I am just so drawn to the colours of the whole line. So funky!!
Supplies: Paper: Prism, Making Memories, Papertrey Ink; Stamp: Elzybells; Koh-I-Noor pencils and gamsol, Ribbon from My Little Ribbon Shop.
Go to the Elzybells blog to submit your challenge card and view the other DT's efforts!
 Read my last post for thoughts on this stamp. I will most likely sell this stamp because I don't see getting a lot of use out of it, but I thought I would try doing the monochromatic thing that I've seen people do with his stamps.Sure makes it a hell of a lot easier, that's for sure!! I added a punch of colour to the lighthouse to make it stand out more as the focus of the painting using Koh-I-Noor pencils and odourless mineral spirits. I could have left it all brown, but C'est La Vie..
 Supplies: Paper: Bazzil, PapertreyInk; Stamps: Light of Peace Thomas Kinkade by Cornish Heritage Farms, Polka Dot Basics by PapertreyInk: Ink: Nick Bantock by Ranger in Lamp Black, New Canvas by Palette; Koh-I-Noor Pencils, Odourless Mineral Spirits, Nestabilities, Ribbon.

